Yes, I’m still on the electronics kick. This is something I’ve been wanting to do as part of a complete home automation project down the road: monitor the temperature of the different rooms / zones in my house. Now that I’ve got a few Arduinos laying around and some thermal probes (thermistors) from some broken Radio Shack temperature displays, I’ve got the hardware necessary to make it happen! I first installed the thermal probes in the ceilings of the master bedroom, my daughter’s bedroom and our living room in locations that I thought were least affected by vents, fans, lights and other sources of heat. Here’s a picture of the probe in my living room:

Thermal Probe in my Living Room
Next, I connected the three probes to my Arduino’s Analog Inputs using the thermistors as voltage dividers between +5VDC and Ground. In order to detect the temperatures and make them accessible via the Arduino’s serial interface, I used a few examples on the Arduino site as the basis for this program, which waits for a character to be sent to the serial port, then outputs the temperatures:
#include <math.h>
//Schematic:
// [Ground] ---- [10k-Resister] -------|------- [Thermistor] ---- [+5v]
//                                     |
//                                Analog Pin 0

double Thermistor(int RawADC) {
 // Inputs ADC Value from Thermistor and outputs Temperature in Celsius
 //  requires: include <math.h>
 // Utilizes the Steinhart-Hart Thermistor Equation:
 //    Temperature in Kelvin = 1 / {A + B[ln(R)] + C[ln(R)]^3}
 //    where A = 0.001129148, B = 0.000234125 and C = 8.76741E-08
 long Resistance;  double Temp;
 Resistance=((10240000/RawADC) - 10000);
 Temp = log(Resistance);
 Temp = 1 / (0.001129148 + (0.000234125 * Temp) + (0.0000000876741 * Temp * Temp * Temp));
 // Convert Kelvin to Celsius
 Temp = Temp - 273.15;
 // Convert to Fahrenheit
 Temp = (Temp * 9.0)/ 5.0 + 32.0;
 return Temp;
}

void printDouble(double val, byte precision) {
  Serial.print (int(val));  //prints the int part
  if( precision > 0) {
    Serial.print("."); // print the decimal point
    unsigned long frac, mult = 1;
    byte padding = precision -1;
    while(precision--) mult *=10;
    if(val >= 0) frac = (val - int(val)) * mult; else frac = (int(val) - val) * mult;
    unsigned long frac1 = frac;
    while(frac1 /= 10) padding--;
    while(padding--) Serial.print("0");
    Serial.print(frac,DEC) ;
  }
}

void setup() {
  Serial.begin(115200);
}

#define ZoneOne 1   // Analog Pin 0
#define ZoneTwo 2   // Analog Pin 1
#define ZoneThree 3   // Analog Pin 2

double temp;
int inByte = 0;
int sensorDelay = 10;

void loop() {
  if (Serial.available() > 0) {
    inByte = Serial.read();
    Serial.print("Zone1:");
    printDouble(Thermistor(analogRead(ZoneOne)),3);
    Serial.print(" ");
    delay(sensorDelay);
    Serial.print("Zone2:");
    printDouble(Thermistor(analogRead(ZoneTwo)),3);
    Serial.print(" ");
    delay(sensorDelay);
    Serial.print("Zone3:");
    printDouble(Thermistor(analogRead(ZoneThree)),3);
    Serial.print(" ");

    Serial.println("");
  }
}
I had an old laptop with a dead battery that I wasn’t using, so I loaded it with Ubuntu 10.10 x64, Apache, MySQL, PHP and Cacti and put it up in the attic, connected to the Arduino via USB. I went through the painfully dry Cacti Documentation and wrote a custom Perl script that Cacti uses to poll the Arduino for temperatures:
#!/usr/bin/perl

use Device::SerialPort;
use Time::HiRes qw( usleep );

# Serial Settings
$PORT = "/dev/ttyUSB0";
$ob = Device::SerialPort->new ($PORT) || die "Can't Open $PORT: $!";
$ob->baudrate(115200)   || die "failed setting baudrate";
$ob->parity("none")    || die "failed setting parity";
$ob->databits(8)       || die "failed setting databits";
$ob->handshake("none") || die "failed setting handshake";
$ob->write_settings    || die "no settings";
$ob->read_const_time(50);

while(1){
        $ob->write("x");
        if($_ = $ob->read(255)){
                chomp;
                print "$_\n";
                undef $ob;
                exit;
        }
        usleep(1000 * 10);
}

undef $ob;
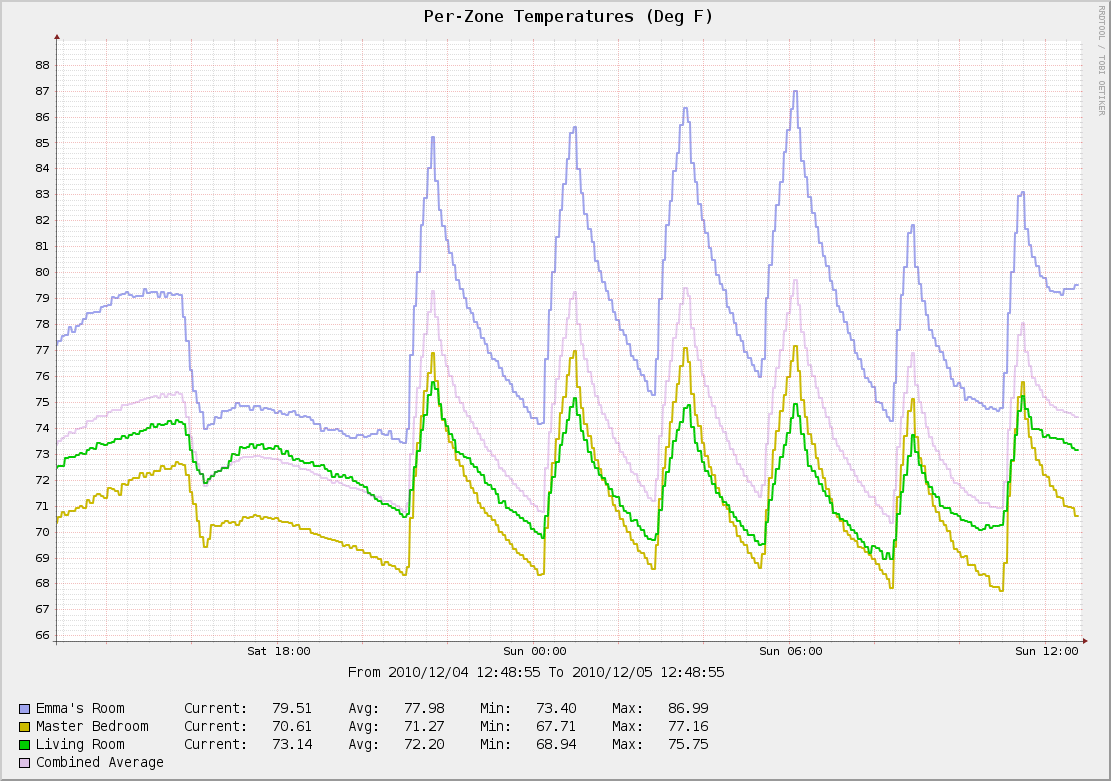
Cacti Graph of my Home's Temperature
Lastly, I put a nice graph together that shows a comparison of the three temperatures over time, with a composite average of all three. Now I can see that my daughter’s room spikes to nearly 90 deg when the heat comes on - ouch! Using this data I am better able to adjust the vents in each room to keep the temperature consistent throughout the house. Next I want to take one of those cheap LCD picture displays and tie it to the Cacti graph and put it near the thermostat so I can think twice about turning on the heat or AC!